Help
What's new in the September 2022 release.
This page gives you a summary of the new features available in the latest release of the DD web system (release 1.20220901.1)
Dashboard summary reports - Payment History Arudd.
To access this new report, click on the following icon in the Summary Reports section on your main dashboard: -

This report will list any payers with that have ARUDD Bacs rejections appearing in their debit history. The report will list payers in summary format but if you want to check the debit history for a payer (Including the ARUDD rejections), just double-click the relevant payer line. You can also download the whole report containing all history and rejections (in csv format) by clicking the "download to csv" icon on the top right of the report listing.
Bulk Payments - User defined profiles.
This new facility allows you to set up your own column content to appear in the bulk screen for input and download. To use this option: -
Click on "Bulk Input" from the main left-hand menu and then click on the "Cog" icoon (highlighted in yellow below): -

This will present a screen that will allow you to select the content to appear in the bulk input screen. By default, "New Profile" will be selected in the profile drop-down so you just need to give the profile a name and then check the content that you want to include. In this example, a profile called "Payer Notes" has been created with content of Surname, Email Address and Notes: -
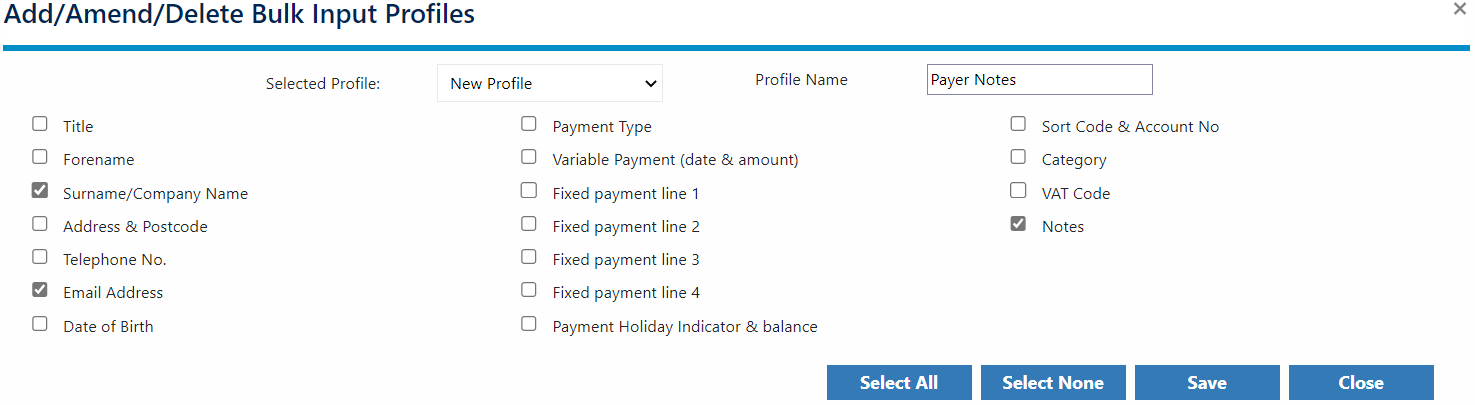
To save the profile click "Save" / "Close" and it will then be available for selection within the "Profile" drop-down. When selected, the screen content will change to reflect the profile as will the the csv download/upload content options (displayed in yellow below): -

Payer Notes
This facility allows you to enter free-form text notes against payers. These notes can then be used when filtering payers and can also be downloaded via the Bulk Input csv download (by creating a new Bulk Input Profile as explained above, with Notes included as content). Using the Bulk Input option you can enter notes for multiple payers. Alternatively, you can enter notes against payers individually via the new input control available on the payer screen: -
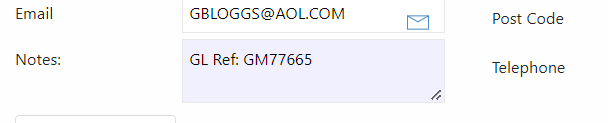
The Notes field is included in search filters which allows a new way of searching for payers. In this example above, where a payer note of "GL Ref: GM77665" has been saved against payer TESTREF0017, we can search for this payer by simply entering "GM777665" in the search box on the main Payer screen: -

TIP: Notes can be set up as content in profiles (See above) to then be used in csv downloads and uploads for interfacing to other systems
Post Code Lookups
This release includes functionality to allow addresses to be looked up via post codes. However, this feature has been turned off at the moment but will be available shortly. Information will appear on the dashboard when this is available. In the meantime, addresses should be entered as they have been previously.
PAPERLESS DIRECT DEBITS
This page gives you a summary of the new paplerless feature introduced into the Direct Debits system (Release 1.20210118.1).
Please note, to use this feature, please contact the DD helpdesk on 08708502578 or email bury.dd@moorepay.co.uk
Paperless Direct Debits (PDD) allow you to set up payers without the need to have paper mandates manually signed and authorised by the payers themselves. Instead, a link will be sent to the payer via email which, if clicked, will present them with an screen to allow them to electronically authorise their mandate details. Alternatively, if you prefer, and the payer has given their consent, you can authorise the mandate yourself (for more information, please see below). This authorisation process is fully audited and can be enquired upon subsequently. In addition to this, the authorised mandate details can be printed or saved locally.
There are many benefits of PDD: -
- Quicker turnaround time – No need to endure postal delays which also means reduced paperwork and postage costs.
- More secure service – No sensitive handwritten mandate information needs to be processed.
- Improved accuracy – Fewer keying errors due to incorrect interpretation of handwritten details and all bank details are checked electronically in real time.
- Improved service – The quicker the payers are signed up the quicker the debits can be taken!
Please note, the Service User Number (SUN) for the collection account must have already been converted to live AUDDIS status.
If you need any more information on this service please contact the DD helpdesk on 08708502578 or email bury.dd@moorepay.co.uk
Further information: Once your customer number is set up for this service, you can send electonic mandates to payers for authorisation, by following these steps: -
- Enter the new payer screen and enter all payer details (as you would normally for a new payer). NB. An Email Address must be present for PDD authorisation purposes.
- Once you save the payer details, you will notice a new Mandate icon appear to the left of the existing Save icon

- Click on this mandate icon. You will now be presented with the payer mandate screen and you will now have the following options: -
 Click on this button to send this madate electronically to the payer for authorisation. This will trigger an email to the payer with a link which will allow then to authorise the mandate details themselves. You can now close this window.
 Click on this button to authorise the madate yourself. You will now need to enter the appropriate authorisation details and then click the
  button. You can now close this window.
 Click on this to view the payer details in a new window.
 Click on this to save or print the mandate details currently displayed on screen.
To support the monitoring of mandate statuses, a new report is included in the Dashboard Summary Reports section called "Outstanding Paperless Requests". This report will highlight any current mandate statuses from pre-authorise to fully authorised and accepted by the bank.

Here is a guide to the different mandate statuses that will be highlighted on the report: -
- Awaiting payer authorisation - The authorisation request is currntly with the payer to authorise.
- Requires new request sending to payer - Some mandate details have been amended. You now need to go into the payer mandate screen and send the request out to the payer to authorise OR manually authorise this change yourself.
- Mandate declined by payer - The authorisation request has been declined by the payer. The reason for this can be viewed via the payer mandate screen and you can decide what to do with this request based on that.
- Awaiting bank authorisation - The authorisation request has been approved (either by the payer or manually) and is awaiting authorisation by Auddis. NB. Once this request has been approved by Auddis it will drop off this report.
Tip: You can also get access to status information by clicking the three dots displayed against each payer on the payer summary table screen on the far right-hand side. This will present further menu options, one of which will be "Payer Mandate". By clicking this you get access to the payer mandate screen but, by hovering over it, you can view the current payer mandate status displayed as a tip.
General Help
Header Bar (left to right)
Clicking the  icon next to the mpoorepay logo will hide/unhide the left navigation Menu.
By default the left navigation is docked to the side. This menu allows you to navigate to the following screens
- - Payers screen.
- - Bulk Input screen.
- - Reports screen.
- - Administration screen. (You only see this if you are an admin user).
Clicking the ![]() logo in the top left takes you to the dashboard.
logo in the top left takes you to the dashboard.
The name of the customer you are in is displayed in the centre as well as the customer number in brackets.
Clicking the  helpIcon will bring up help information relevant to the screen you are on.
Clicking the  notifications icon will give you access to any warnings, errors or informational type notification that has been generated by the system or forwarded to the web system by the DD bureau. For example, any reports you have previously received by post (e.g. Payer Changes Journal or List of Debits) can be accessed this way. In addition to this, any new AUDDIS or BACS reports you access via BACSTel-IP, can also be accessed here (providing you have granted Moorepay permission to do so). Once the reports have been viewed they will be available through the Reports menu
If you have access to more than one customer number you will see the icon  in the top right. Clicking this opens the select customer modal where you can click on the customer you wish to switch to.
Clicking the ![]() user menu icon expands the user menu.
user menu icon expands the user menu.
- The top line shows your Client ID
- Change Password - Allows you to reset your password.
- Preferences - Allows you to turn tooltips on and off.
- Change Profile Image - Will Allow you to upload an Image to replace the silhouette
- Contact Us - Opens ths contact modal. You can use this modal to contact us directly with any issues, suggestions or general feedback.
- About - Opens the about modal which displays some basic information about Moorepay.
- Logout - Logs you out.
Contact Us Form
Along with the traditional methods of contacting Moorepay, this screen will allow you to direct your request to specific areas within Moorepay based on the nature of the request.
Comments – Please enter comments relating to your query.
Query Type – Please select the category that best describes the nature of your query
- Helpdesk – A DD operational type query or general question in relation to the how the DD Web System operates
- Support – A query in relation to a fault or bug encountered on the system
- Feedback – Comments (good or bad) in relation to your experience using the system. Feedback is valuable information that will be used to make important decisions on future system strategy and areas to focus on
- Suggestion – Please submit any comments on how you think specific functions might be carried out better or possible enhancements to the current functionality available to you. Again, this information will be used to assess ways we might be able to improve the system in future releases
Attachment – Please supply any documentation (screenshots etc.) that may help support comments. NB. Please be careful not to supply any information of a sensitive nature through this facility.
Submit – Once all relevant information has been entered click this button and the information you have provided will be forwarded to the appropriate team (based on the query type). You should receive a copy of this email.
Left Menu
By default the left navigation is docked to the side. You can expand it using the horizontal lines icon at the top left of your screen whcih will show you the full menu as text. The current page is always highlighted with a blue circle.
Menu items in the docked state are represented by circles. Expanding the menu using the menu icon shows which item is which. You can also see this by moving the mouse over the item and seeing the tooltip.
- - Payers screen.
- - Bulk Input screen.
- - Reports screen.
- - User maintenance screen.You only see this if you are an admin user.
Dashboard screen.
The dashboard gives high level summary type information about the customer currently selected. This is also the area where warnings and notifications will be highlighted to you if detected elsewhere in the system. Any new reports (generated in the DD Bureau) will be able to be accessed here too.
You can always get back to the dashboard by clicking ![]() in the top left of the screen.
in the top left of the screen.
The screen is contains several Panels as described below:
Communications Panel
This Panel is used for Moorepay to display any communications and notifications to you.
AUDDIS Reports Panel (If applicable)
This panel will allow access to any AUDDIS or BACS reports received by the Moorepay DD Bureau.
The reports will be presented in chronological order (latest first). To view a report, simply click on the relevant line and a report will be displayed in a format you should be familiar with.
Tip: The payer references will be displayed in blue and are clickable. Once clicked, you will be taken to the payer enquiry / amend screen in another window for the selected payer. Simply close the payer window when you are finished with it.
Payment History & Projected Payments Panel
This panel displays a graphical representation of all of your payer debits summarised on a month by month basis over the course of the last 12 months. The different checkpoints on the graph can be hovered over to display (via fly-by hints) the number of debits processed and the value of those debits for the month in question. If the checkpoint is clicked the payment history will be represented on an individual payment basis for that month.
If the “Show projected payments” checkbox is clicked then a representation of displayed of payments projected 12 months into the future. This will take into account any variable or fixed payment programs and will cater for changes in fixed payments (due to multi-line arrangements). Again, the checkpoints can be queried and reported on by clicking in a similar way to that highlighted for the Payment History.
Unprocessed Changes Panel
Every evening (at about 7pm), any data that has been keyed into the web system that day will be taken and processed by the back end bureau system (NB. This can be changed, if required). Any data that has not yet been processed by the backend (I.e. data that you have keyed in the current processing day) will be represented in graphical form in this panel and can be viewed in report format.
The information is categorised into the type of input keyed with each colour representing a different type. For example if the graph had a “72” in the center, this would indicate that there are 72 separate pieces of input in total split over a number of different types. To view the input keyed, either click on the middle segment to see a report consisting of all the different types of data or, alternatively, click on individual segments to view a report based on only that specific input type.
To view the input keyed, either click on the middle segment to see a report consisting of all the different types of data or, alternatively, click on individual segments to view a report based on only that specific input type.
The individual payers represented on the reports can be accessed directly by clicking the payer reference link (displayed in blue) on the report. The payer enquiry / amend screen for the specific payer will be opened up in a separate window. NB. You will need to close this window when you are finished with it.
Payment Summary Panel
This summarises the number of debits taken in the last month and the monetary value of those debits. You can also view any rejections AUDDIS/BACS rejections via he “Failures” figures displayed here.
Summary Reports Panel
This panel displays a number of summary reports that are available to you. Clicking on each report will bring up a summary described by the title.
Payers
This screen will display all of the payers for the selected customer in summary format. No details can be edited directly through this screen but the icons displayed on the right hand side of the table allow you to take actions on the selected payer. You can double-click a payer reference to access the Payer Amend screen directly for the payer.
By Clicking the checkbox "Show changed PayersOnly" the list will be shortened to only those payers that have been amended since the last processing update.
You can also undo All changes made by clicking the  Icon on the top right. N.B. This icon is repeated on each line to undo all changes made to that particular payer.
The number of payers displayed per page in the list can be adjusted by chosing an option in the dropdown to the left of the search box.
Searching
The search facility is intelligent enough to allow you to search over all the content displayed on screen. For example if you typed the number 9 in the search box displayed above the payer list then this would narrow down the display to the payers with Amounts that contain a 9, payers with a category of 09 and payers with a 9 in their reference. N.B. You can narrow down this search by choosing a particular column to search on.
Viewing Payment History/Payer Changes/Payer Mandate
Clicking the icon  to the right on each line, will open a submenu of the Payment History/Payer Changes/Payer Mandate.
- Payment History - This will display a table of payer debit history. By clicking the icon
 top right of the resulting table you can view the projected payments for the payer over the next 12 months.
 - Payer Changes - This will display a Table showing details of what has been changed with the payer.
- Payer Mandate (if applicable) - Allows you to set up a DD Mandate for the Payer.
Cancelling a Payer
Clicking the icon will send a cancellation request for the specific payer to the bureau. You will have the opportunity to revert this process by clicking the
  icon which will replace the normal Cancel Payer icon. N.B.. This revert option will only be available to you during the current processing day
Adding a Payer/Amending a Payer
To Add a new payer click the  Icon on the top right.To Amend an existing Payer click the
  icon against the payer.
Clicking either of these will access the main payer amendment screen (Nb. this screen can also be accessed by double clicking the payer in the table).
Once on the Screen please note :
- Clicking the Add Payer icon at the top of the payer list allows you to add a new payer to the system. This will present the same screen as amending a payer but with all fields blank and an extra field for the Payer Reference. Once all required details have been entered, click the Save Screen Changes icon in the top-right of the screen and the Payer will be added to the customer.
- Any field that has been amended in the current processing day will be displayed with a light grey background. A count of the number of amendements/additions is kept at the top of the screen.The icons displayed (top-right) perform the following; Save screen changes, Cancel Payer and Cancel screen changes, respectively.
- The bottom panel will switch between variable and fixed input content depending on the payment type selected in the “Payment Type” drop down.
Payment Programs
Open ended fixed payment lines - If you don't enter a number into the Number field on a fixed payment line it would symbolise an open ended recurring payment based on the frequency you specify. You can also enter 0 to acheive the same effect. If a finite number of payments had been set then you would have the opportunity to add further fixed payment lines to the program.
"One-off" payments for fixed payers - This option allows you to setup individual payments outside of the normal fixed payment program for the payer. This could be useful if, for example, you are setting up a new payer on a standard monthly program but you require an initial irregular debit to be taken, perhaps for a different amount, prior to the regular program starting. NB. these one off payments can be made at any point during the fixed payment program. To do this, follow these steps: -
- A new checkbox is available for all fixed payers as shown here
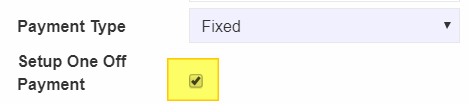 simply click this and a new tab will appear below (to the right of the existing fixed payment tab).
 - Set up the fixed payment program as normal and then click the new "One Off Payment" tab above.
- You can now set up an additional payment that may be taken before, during, or after the period in which the fixed payment program is in place.
NB. One off payments may be set up multiple times for a payer but only one may be in place at one time. Also, these types of payments will not be affected by payment holidays (explained below).
Payment Holidays - This facility allows you to suspend payments for a payer on a fixed payment program. This is how this works: -
-
This is how payment holidays work: -
- No fixed payments will be debited from the payer.
- Any fixed payments amounts are instead added to a balance that is held against the payer.
- The balance will be retained even when the payment holiday is lifted.
- The payer will remain active on the system while there is an outstanding balance held against them (unless they are manually cancelled).
- A new report is available in the Summary Reports panel of the dashboard to highlight payment holiday information.
This is how to set up payment holidays: -
- On the individual payer amend screen you will now see this new button: -

- By clicking the button it will change to: -
 .
. - The Payer is now on a payment holiday and the balance (for any future payments) will be accumulated in the field to the right of the button.
- This balance can be manually amended at any time.
- The payer can be removed from the payment holiday by clicking the red "On payment Holiday" button (however, the balance will remain in place).
NB. The payment holiday will only impact fixed payments from the fixed payment program. Any "One-off" payments (see above) will be processed as normal.
Fixed Payment Templates
It is possible if you have administration rights to also set up fixed payment templates. These will appear in the frequency dropdown when setting up fixed payment lines. The idea of these is to set up the detail of commonly used payment plans so that when chosen they will prepoulate all the fields in the payment line. For example : If you have many payers that would be taking £100 each month for 12 months on the 1st of the month, you could set this up in "Administration" and give it a name of "100 every 1st" (for example). This would then appear in the frequency drop down. Once chosen the payment line would work out the next available 1st of the month and set up all the fields on the payment line.
Bulk Input
The concept behind this screen is to allow you to enter related data for multiple payers quickly in a spreadsheet style format.
Searching
You can search across all columns displayed by typing directly into the search box. However, if you need to search on specific criteria, you can do this now by selecting the relevant type in the drop-down to the left of the search box. For example, to search on all payers with a Category "03" then select "Category" from the search drop-down and enter "3" into the search box. Alternatively, to search on all variable payers select "Type" from the drop-down and type "var" in the search box.
Bulk Amends csv downloads/uploads.
The content of the csv downloads now reflects exactly what you see on screen. For example, if you have the screen display narrowed to variable payers on category "03" then only this content will be pulled through to the csv download.
Bulk Input Types
By default, the “Basic” input type is selected which will give access to standard type payer data amendments. Alternatively, Address, Fixed and Variable may be selected which will allow differing content to be amended. If, for example, you had a lot of variable payments to enter for a certain date then clicking “Variable” would display a screen showing a list of Variable payers with 2 columns for payment date and value. Only future payments will be allowed to be submitted and only amended future payments will be saved when the “Save Changes” button is clicked (so you do not need to remove any previous payment details, they will not be processed again).
Tip: If you check the “Show changed data only” then the screen will only display data that has been amended for the selected input type in the current processing day. This makes it easy to only check the data you have amended.
Tip:The Search box will narrow down the display selection to the criteria you enter here.
Exporting Data
In addition to the method if input explained above, there is also the option to export data to csv file.
This means that you could then open the csv file in a 3rd party app (such as MS Excel), amend the data in that app and re-import it back into the DD web system. This process is detailed in steps below: -
- Enter Bulk Input.
- Click the icon which is located to the right of the search box.
- If you have a default handler application for csv files then you will be prompted to open the resulting csv file in this application, otherwise you can simply save this file.
- Open the file in an application that can view CSV files (e.g. Microsoft Excel, Google Sheets).
- You can now edit the data as required. Once you are ready, you will need to save the data to a file that is easily identifiable from within the web application. NB. The file must be saved as a CSV type file.
NB. You may get the warning filename.csv may contain features that are not compatible with CSV; Just click the “Yes” button to this.
Create bespoke csv profiles for download & upload
This feature allows you to tailor the csv download to suit your own requirements. This means that you can set up your own individual profiles specific to the details required for a particular task and you can also change the column headings in the process.
This feature could be useful if you are importing csv extracts from a 3rd party application and need to map their data specifications to a format that will be recognised by this application import and vice versa.
For example, if you wanted to import a csv from a 3rd party application that contained addresses and email details and had the following column headers "PAYERREF","ADDL1","ADDL2","ADDL3","POST","EMAIL" then this could be imported into this screen by following these instructions: -
- Click on the
 icon (to the right of the the "Profile" drop-down; you will now be presented with a screen in which you can select the content for your download.
 - You will be automatically taken into the "New Profile" setup screen and you will need to enter an appropriate name in the "Profile Name" box; for example "ADDRESSES"
- By default, no content is added to your profile and you can simply add the "PAYERREF","ADDL1","ADDL2","ADDL3","POST","EMAIL" text titles to the appropriate edit boxes to the right of the standard system data titles and leave all other fields as "Not used".
- ClickSave to save this profile.
- Click the icon and navigate to select the file to import (now this profile has been set up, whenever you need to import the same data, you just need to make sure that the "ADDRESSES" profile is selected in the Profile drop-down prior to clicking the icon).
- Please note, If you are importing input from another application then payer references must be identical apart from one important difference, only payer references prefixed by "REF_" will be imported. For example, if there is a payer reference "BLOGGS001" within this system then this must be imported as "REF_BLOGGS001" for a match to be made.
Tip: You can set up bespoke csv content for downloading by clicking and then opening and editing the resulting csv download in another application (E.g. Excel). This amended content can then be re-imported by clicking the . The DD system will then detect any changes and amend the payers accordingly (more detailed instructions for this process are given in the normal help below). This may be a convenient way to set up multiple variable payments.
Once you have a profile set up in this way, you will always have it available for selection via the "Profile" dropdown selection box.
Selecting a profile of "Default" will allow the usual selection of the standard "Basic", "Address", "Fixed" or "Variable" downloads.
If you no longer require a profile, select it via the "Profile" drop-down box and clickDelete.
NB. Selecting a bespoke profile will not change the columns displayed on the main bulk amendment screen (this facility will hopefully be available at a future date).
Importing Data
Once you have completed your changes in the file you exported you are ready to import the data back into the system following the steps below:
- Enter Bulk Input if you are not already there
- Click the which is located to the right of the search box.
- In the Import CSV dialog that pops up, click the browse button. This will open a dialog to allow you to navigate to and select the file that you saved in the previous step. Once you have selected this file it will be displayed alongside the “Browse” button.
- Now click “Validate File” and the selected file will be subjected to various validation checks. If any validation errors have been detected they will be displayed in another dialog.
- You now have the opportunity to open the file you originally saved and try to correct any of the data errors highlighted. You can go through this process repeatedly until you are happy with the data you are presenting to the Web upload.
- Once no more validation errors have been detected you will have the option to import the file. The Validate File button will have gone and been replaced with an Import File button.
- Click “Import File” and the data you have amended externally to the Web application will be imported into it. You will be given confirmation if the import was successful.
Things to Remember
- In the exported csv file there will be a header record which identifies each column of data. This record must ALWAYS be present in the file that is imported back into the Web system and the column heading descriptions must not be changed in any way.
- Payer_Ref column – This column must remain unchanged. The system will prepend the string “REF_” to each payer reference and this string must NOT be removed OR the payer reference itself changed.
- ChkSum column – This column must remain unchanged and MUST be present in the file imported back into the system. It is required for checking purposes by the system internally and is never imported as data.
- Removing columns that are not required – If required, you can delete entire columns of data (apart from the “Payer_Ref” and “ChkSum” above!) and import only columns of data relevant to the type of input you want to process. If you delete a column you must delete the column heading description too.
- Removing records that are not required – If required, you can delete complete records of data leaving only the records you want to amend.
- New payers – You have the ability to set up new payers through this process. To do this, insert a new line for each new payer and make sure that at least the mandatory columns are present in the imported csv file and are populated for each new payer (“Payer Ref”, “Surname/Co. Name”, “Sort Code”, “A/C Number” & “Payment Type”). NB. If “Payment Type” = “F”, the following columns must also be present “Pay Frequency (1)”, “Start Date (1)”, “Amount (1)”, “Number (1)”, “Dormancy (1)”. Also, any payer references for new payers must be preceded by “REF_” (as explained above). The “REF_” will be stripped off by the import
Multiple fixed program changes for fixed payers.
This facility will allow you to amend the fixed payment programs of multiple fixed payers with a single instruction. This can be based on various criteria and you have the option of adjusting the regular fixed payment amount by either by a positive or negative amount or a percentage. Here are some examples where this may be used: -
- Entering a "Payer Category" of "3" and an "Amount Alteration" of "5" would result in all fixed payment lines for all payers with a category of 3 being increased by £5
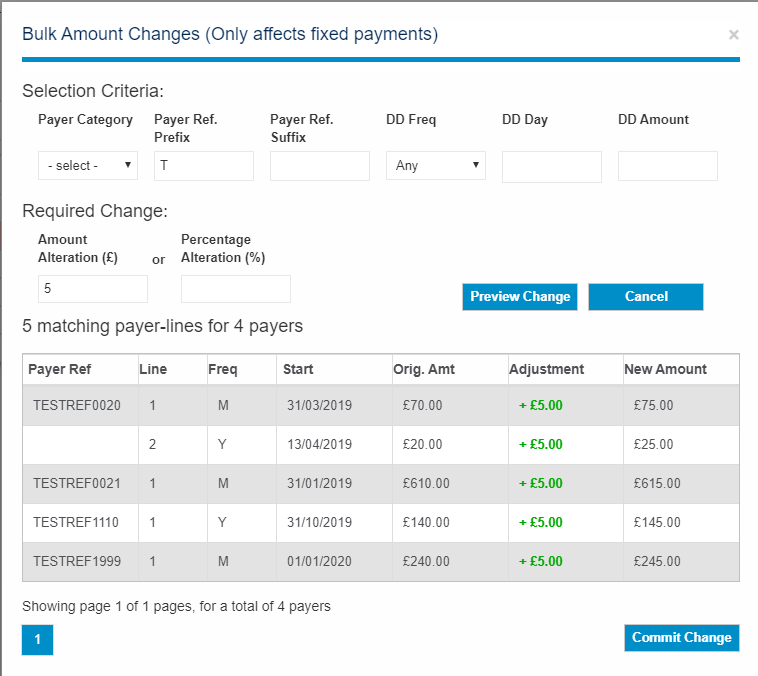
- Entering a "Payer Prefix" of "T" and an "Percentage Alteration" of "10" would result in all fixed payment lines for all payers with payer references that start with "T" being increased by 10%
- Entering a "DD Day" of "15" and a "DD Amount" of "25" and a "Amount Alteration" of "7.50" would result in all fixed payment lines starting on the 15th day in a month (regardless of month or year) with a fixed amount of £25 being increased by £7.50
You can access this facility by first clicking the  icon near the top of the bulk amendment screen (Input Type "Fixed") and entering the relevant criteria in the screen that is presented: -
You can enter criteria and adjustment values as appropriate. When you want to see the effect your changes will have (without saving any actual changes yet), click on "Preview Change" and a list of fixed amounts that will be effected by this change, with "before" and "after" values, will be displayed as shown below: -
Please Note: -
- For reference and checking purposes, the complete payment program for a payer will be displayed in the results panel, even if not all lines are affected by the changes requested.
- To save changes displayed in the results panel, click the "Commit Change" button.
- To ignore changes displayed in the results panel, click the "Cancel" button (to the right of the "Preview" button) and simply re-enter.
- These changes will only effect "Active" payers and, if your criteria permits, will effect the next payments for the payers concerned.
- A maximum of 1000 changes, in a single request, will be permitted through this facility. If the results screen indicates that you have exceeded this limit, you should narrow down the criteria to limit the result set and try again.
Reports
Gives you access to a number of different report options that can be tailored for your requirements. You can make good use of the "Search" and "Date From" and "Date To" fields here to allow specific drilling down to certain input criteria. For example, if you typed in "john" to the main "SEARCH" box and selected 10th Oct 2021 in the "DATE FROM" field, this would report on any input keyed by "john" on 10th October 2021
Clicking the ![]() icon, will allow you to download the current report and save in csv format.
icon, will allow you to download the current report and save in csv format.
Clicking the checkbox "Show Summary" (on Payer changes reports) will change the report to summarize to Payer level. N.B. clicking on each line will expand that payer to show the details.
Clicking the checkbox "include on holiday transactions (Debit Report), will include any transactions processed whilst the payer was set to on holiday.
Current Payer Changes
This is displayed by default on entry to the “Reports” menu option and reports on any data keyed into the system in the current processing day.
Historical Payer Changes
This allows you to view and audit data that has been previously keyed into the system. This is similar to the Current Changes Report but also reports on the previous value of any data item alongside the new value entered at that specific time.
Debits Processed
This will report on Direct Debits transaction history in chronological order (most recent first).
Archived Reports
This option gives you access to any reports previously viewed via the dashboard or notification options. Reports may be viewed by simply clicking on the relevant report line.
Administration
Various Panels will be available here depending on your access Levels
Users Panel
You can see and manage the users that have access to your customer numbers here. The user table can be filtered using the search box.
User Profiles
By Clicking the  Icon, you get access to setting up your own bespoke user profiles.This feature will allow you to set up profiles in which you can set up generic permissions which then can be applied to groups of users.
User profiles will allow you to have much more control over the access you can assign individual users or groups of users.
Holding these at a profile level means that you can set profiles based on individual group access requirements. As a result, you only need to set up one profile for a group of individuals and then you can apply this profile to individual users and they will inherit these access controls from the profile. It also means that, if these requirements change, they only need to be changed once at the profile level rather than at individual level.
In addition to the standard access controls you are probably familiar with, profiles now allow you to apply the following extra controls over user access: -
NB. Administrator access (and the new ability to amend profiles) is still held against the individual user.
Please follow these steps to set a new user profile: -
- If you have the authority, click
 Icon - This will give access to Users Panel.
 - Once in the users Panel Click - This will allow you to setup a new (or amend an existing) user profile.
- You will now see the following screen: -
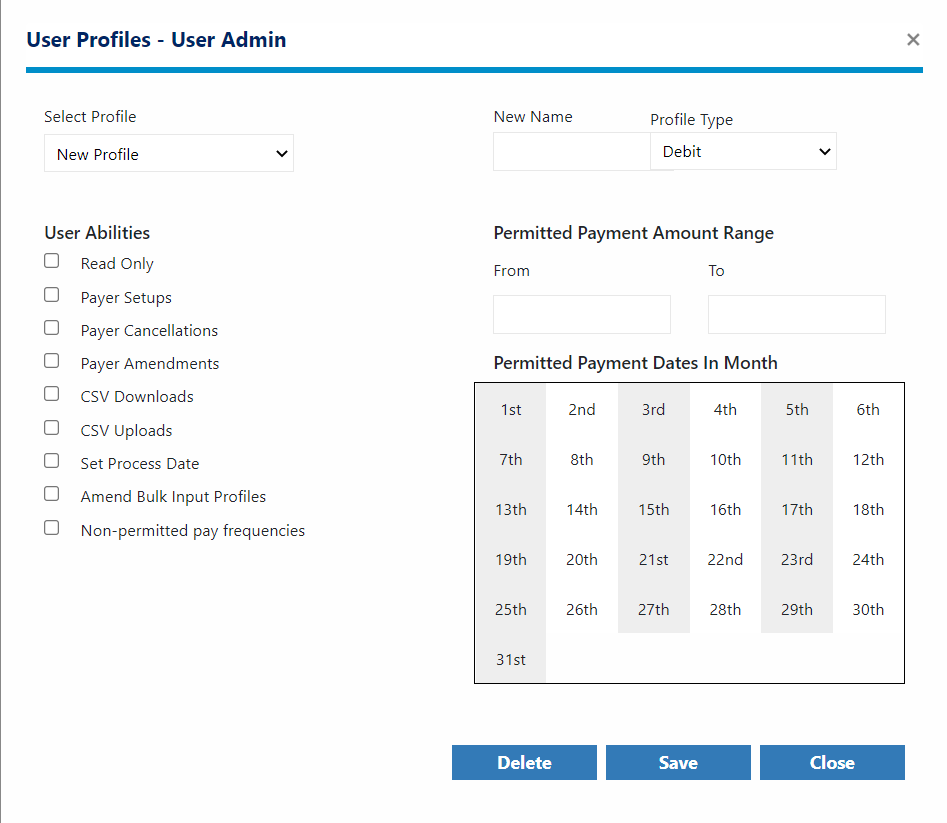
- With "New Profile" selected in the drop-down, type an appropriate name in the "New Name" edit box. In this example, we are creating a profile named "ACCOUNTS_001"
- By default, no settings are granted so start by applying the relevant "User abilities" to this profile: -
- Read Only - When checked, no changes will be allowed.
- Payer Setups - When checked, new payer setups will be permitted.
- Payer Cancellations - When checked, payer cancellations will be permitted.
- Payer Amendments - When checked, payer amendments will be permitted.
- CSV Downloads - When checked, downloads of payer information will be permitted.
- CSV Uploads - When checked, the user will be allowed to upload csv content into the system (via Bulk Amendments).
- Set process date - When checked, the user will be able to suppress the processing of payer input.
- Amend bulk input profiles - When checked, the user will be able to setup/amend bulk input profile templates.
- If you want impose restrictions on the amounts that can be set up against variable or fixed debits then enter the range in the "From" and "To" boxes (as whole pounds). In this example we have set up any value up to a maximum of £100.
- Finally, if you set up debits on a monthly payment basis and they are generally debited on regular dates in the month, you can set up these dates under "Permitted Payment Dates In Month". In this example, the only DD dates that may be input are ones for the 10th and 22nd of any selected month.
Once you have a setup all required controls, click the Save Button.
After saving, the user profile can be subsequently amended by selecting it in the "Select Profile" drop-down; it will then load ready for amendment. If you no longer require it, click the Delete Button and it will be removed permanently.
Now that we have a profile called "ACCOUNTS_001" setup we can now assign this to individual users: -
- Within the Users Screen, double click the username that you want this profile assigned to.
- On the user maintenance screen, the bottom panel controls customer number access. In the drop-down against each customer number, along with the usual "Full", "Enquiry", and "Deny" access you will see the additional profile that has just been set up. Simply select this profile and these bespoke controls will now be applied when the user accesses this customer.
Adding Users
You can add a new user using the  Icon at the top right of the user table. Clicking this will open an modal window where you can enter the details of the new user.
Managing Users
You can manage an existing user by either double clicking the user row or clicking on the icon against the user at the right hand side of the user table. Doing either of these actions will open the same dialog as the Add User however it will be pre populated with the users details.
User Dialog
Basic user details like Name, Email and Type are required. The Type field will default to Normal for New Users.
- Reset Password - Checking this will perform a password reset and an email will be dispatched to the user with the new pasword.
- Force User Password Change - Checking this will force the user to reset their password when they next login.
- Disable Access - Checking this will stop the user from being able to be logged in. Unchecking this will allow them access to the system again.
User Types
There are two types of users. Normal and Admin. Admin users have access to all customers in the client, can access the Administration menu and manage users. Normal users have access to the customers that are defined in the access table that appears at the bottom of the dialog when the Type is set to Normal.
- Deny Access - The user has no access to the customer.
- Enquiry Access - The user has read only access to the customer.
- Full Access - The user has read/write access to the customer.
By default the user has Enquiry access to all customers. You can change them individually or all in one go by using the dropdown at the top of the access table. That will change all dropdowns against all customers to the selected value.
You can save any changes to the user by clicking the Save button at the bottom of the dialog. This will send the user details to the server and either add or amend the user.
Clicking the Close button at the bottom of the dialog will close the dialog without saving the changes.
Deleting a User
To delete a user, double click the user in user table and click the Delete User button at the bottom of the dialog.
Fixed Defaults Panel
On the Main page there is a panal named Fixed Defaults. This is a screen that will enable you to set up "defaults" for fixed payment lines..These will appear in the frequency dropdown when setting up fixed payment lines. The idea of these is to set up the detail of commonly used payment plans so that when chosen they will prepoulate all the fields in the payment line. For example : If you have many payers that would be taking £100 each month for 12 months on the 1st of the month, you could set this up in here and give it a name of "100 every 1st" (for example). This would then appear in the frequency drop down. Once chosen the payment line would work out the next available 1st of the month and set up all the fields on the payment line.
This is very handy for customers who may have several standard payment programs. Instead of having to set each one up individually, they can once set up choose a template and apply it quickly against the payer.
Once in the screen, you will be presented with a table of any templates that are already set up.
To add a New template click the ![]() icon, this will bring up the template screen which can be simply filled in as in the example below :
icon, this will bring up the template screen which can be simply filled in as in the example below :
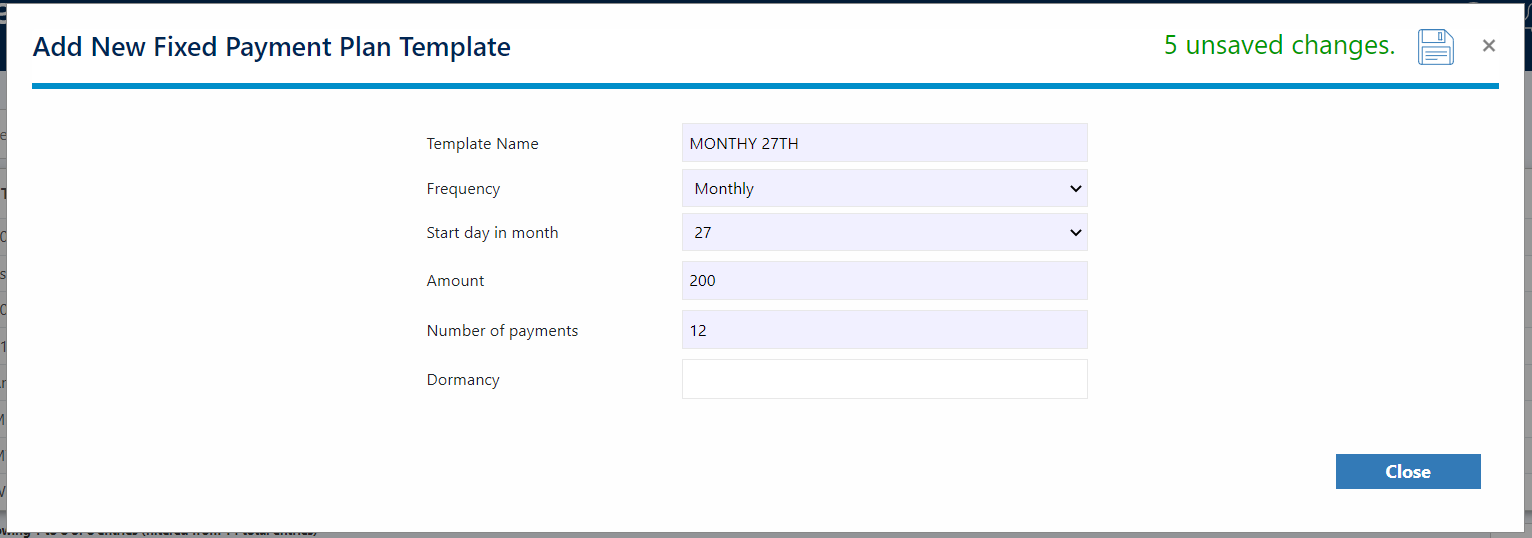
In this example this Template would now be available in the frequency dropdown of the fixed payment setup. If chosen the very first available date of the 27th would populate the start date field and all the other fields would be populated with these details.
Whats New - As of 01/03/2022
Here you will find a summary of the latest changes since the last update.
Direct Credits.
As this is the first release of our Direct Credits web server everything is New. Please take a look through the other help items for an overview of each area.
General Help
Header Bar
Clicking the ![]() logo in the top left takes you to the dashboard.
logo in the top left takes you to the dashboard.
Clicking the  icon next to the moorepay logo will expand the left navigation icons into a much wider menu system.
The name of the customer you are in is displayed in the centre as well as the customer number in brackets.
User Menu
Clicking the ![]() icon expands the user menu.
icon expands the user menu.
- Change Password - Allows you to reset your password.
- Preferences - Opens the preferences modal. You can then set some personal preferences for the site.
- Change Profile Image - Clicking on this allows you to change your profile picture. It will open an modal dialog where you can upload your profile picture.
- Contact Us - Opens ths contact modal. You can use this modal to contact us directly with any issues, suggestions or general feedback.
- About - Opens the about modal which displays some basic information about Moorepay.
- Logout - Logs you out.
Contact Us Form
Along with the traditional methods of contacting Moorepay, this screen will allow you to direct your request to specific areas within Moorepay based on the nature of the request.
Comments – Please enter comments relating to your query.
Query Type – Please select the category that best describes the nature of your query
- Helpdesk – A operational type query or general question in relation to the how the DD Web System operates
- Support – A query in relation to a fault or bug encountered on the system
- Feedback – Comments (good or bad) in relation to your experience using the system. Feedback is valuable information that will be used to make important decisions on future system strategy and areas to focus on
- Suggestion – Please submit any comments on how you think specific functions might be carried out better or possible enhancements to the current functionality available to you. Again, this information will be used to assess ways we might be able to improve the system in future releases
Attachment – Please supply any documentation (screenshots etc.) that may help support comments. NB. Please be careful not to supply any information of a sensitive nature through this facility.
Submit – Once all relevant information has been entered click this button and the information you have provided will be forwarded to the appropriate team (based on the query type). You should receive a copy of this email.
Customer Selection
If you have access to more than one customer number you will see the  icon in the top right. Clicking this opens the select customer screen where you can click on the customer you wish to switch to.
Notifications
The  icon in the top right will give you access to any warnings, errors or informational type notification that has been generated by the system or forwarded to the web system by the bureau..
Left Menu
By default the left navigation is docked to the side. You can expand it using the icon at the top left of your screen whcih will show you the full menu as text. The current page is always highlighted in blue.
- - Payee Details.
- - Payment Input.
- - Reports.
- - Administration.(You only see this if you are an admin user.)
Direct Credits Dashboard Screen.
The dashboard gives high level summary type information about the customer currently selected. This is also the area where warnings and notifications will be highlighted to you if detected elsewhere in the system.
You can always get back to the dashboard by clicking ![]() in the top left of the screen.
in the top left of the screen.
Communications Panel
This will contain any messages and communications from Moorepay.
Current Run Data Panels
The four sections in this panel summerize the status of the current, unsubmitted run. At a glance you can see the credit date, payment total, number of new payees added and payees deleted.
Run History Pane
This panel shows you a summary of up to the last 25 runs. Each run can be clicked on to show the actual detail of that run
Payee Details
This screen will display all of the payees for the selected customer in summary format. No details can be edited directly through this screen but the icons displayed on the right hand side of the table allow you to take actions on the selected payee. You can double-click a payee reference to access the Payee Amend screen directly for the payee.
- brings up the payee details which can be edited or viewed
- cancels the payee
- brings up a small menu allowing with a choice to view the
 payee history or
  payee changes. Clicking on either icon will the bring up a panel displaying the either a detailed list of all payments made to the payee or all changes that have been made to the payee.
Searching
The search facility is intelligent enough to allow you to search over all the content displayed on screen. For example if you typed the number 9 in the search box displayed above the payee list then this would narrow down the display to the payees with amounts that contain a 9 and payees with a 9 in their reference etc.
By default this is set to search across all columns, however this can be changed to narrow down to a particular column, by changing the dropdown to the left of the search box.
Amending/viewing a Payee
Clicking the icon against a payee will allow access to the main payee amendment screen (Nb. this screen can also be accessed by double clicking the payee in the table).
The ![]() icons displayed (top-right) perform the following; Save screen changes and Cancel payee.
icons displayed (top-right) perform the following; Save screen changes and Cancel payee.
Cancelling a Payee
Clicking the icon will cancellation the specific payee.
Adding a New Payee
Clicking the  icon at the top of the payee list allows you to add a new payee to the system. This will present the same screen as amending a payer but with all fields blank and an extra field for the Payee Reference. Once all required details have been entered, click the
  icon in the top-right of the screen and the payee will be added to the customer.
Payment Input
This screen allows you to enter all the payment data for the current run.
Run
The current run is displayed by default. The Run drop down allows you to quickly view previous runs.
Target Payment Date
This is the date you need the payments to land in the payees account.
Clear Data
Clicking the  icon will clear any data keyed against the payees in the current run. This option will be available if there is currently data entered in this run.
Pre Populate From Run
This option will be available if there is currently no payment data entered in this run. The dropdown allows you select a previous run, and have that runs data become the basis for the current run. All the payees payments will be populated.
Download Template File
Clicking ![]() will allow you to download a template file should you prefer to enter you data via csv/excel rather that key stright into the screen. As well as any current data in the payment and bacs hash fields, it will also output the address fields and bank details for editinig.
will allow you to download a template file should you prefer to enter you data via csv/excel rather that key stright into the screen. As well as any current data in the payment and bacs hash fields, it will also output the address fields and bank details for editinig.
Upload Template File
Clicking  will allow you to import a previously downloaded and amended template file. After selecting the file you wish to upload, click the Validate File button. Any validation errors will be displayed and if there are no errors you can click the Import File button.
Cancel Run
If there is a submitted run, but the BACS file has not yet been sent i.e. there are still 3 working day before the payment date, then you can cancel that run if required by selecting the run from the Run dropdown and then clicking the Cancel Run button.
Recall Run
If there is a submitted run, but the BACS file has not yet been sent i.e. there are still 3 working day before the payment date, then you can recall that run so as to make changes by selecting the run from the Run dropdown and then clicking the Recall Run button. Doing this will effectively cancel the selected run, and replace the current run with data from that run. This data can new be amended as you see fit and submitted in the usual way. You will still see the select run in the Run dropdown for reference. *Note The replaced current run, will then return as the current run once you have submitted the recalled run.
Submit Run
Clicking submit will package up the payment data for the current run ready for transmission to BACS. This action will also roll the run over to the next one and present you with a new blank run ready for data entry. The data submitted will be available for recall or cancellation until 3 working days before the pay date.
Reports
Gives you access to a number of different report options that can be tailored for your requirements. You can make good use of the "Search" and "Date From" and "Date To" fields here to allow specific drilling down to certain input criteria.
Historical Payer Changes
Here you can search through changes made to payees.
Historical Payments
Here you can search through payment data for payees.